

School Earthquake Preparedness Guide and Checklist
There is so much information online about disaster preparedness and guides, and let’s face it, most of them have nothing to do with schools. So I am providing information specifically for schools and their staff. Even if your role is the Risk Manager in your school district or disaster preparedness coordinator for your school site, disaster preparedness is probably not your only responsibility.
So in this guide, I’m putting together all the important things that matter to a school and help you to create a real world plan and response to an emergency. This is not a typical generic post that you'll find online, this information was developed over 28 years working with schools.
I’ve designed the checklists to be easy to follow, just select the group you belong to and you will find all the information that you need specific to you and your group. For example, if you are a member of the Search & Rescue Team, just click the Search & Rescue Group and you will find all the information that you need to know. If you are the Incident Commander or the Risk Manager of your school district, you can go through the sections one by one. Try to focus on one group each week (bookmark this page and save it so you can re-visit this information). So let's get started! Here's the outline of what we will cover in this guide/checklist.
Outline:
- Plan Overview
- Evacuation Route and Locations
- Emergency Response Team Structure
- Training & Skill Practice
- Supplies
- Mitigation
Earthquake Preparedness Plan Overview
When a major earthquake happens during school hours, you and your staff will be forced to make many decisions affecting life and safety very quickly. We want to provide you with the confidence you are making the right choices. Depending on how you respond and how prepared you are, will dictate if your situation gets better or worse.
And the biggest challenge is that - you will be on your own. Professional rescuers and outside resources will not be able to help you immediately. The first 60 minutes following a major earthquake is the most critical time affecting the outcome of your schools survival and recovery.
This is a sample overview of your disaster response plan:
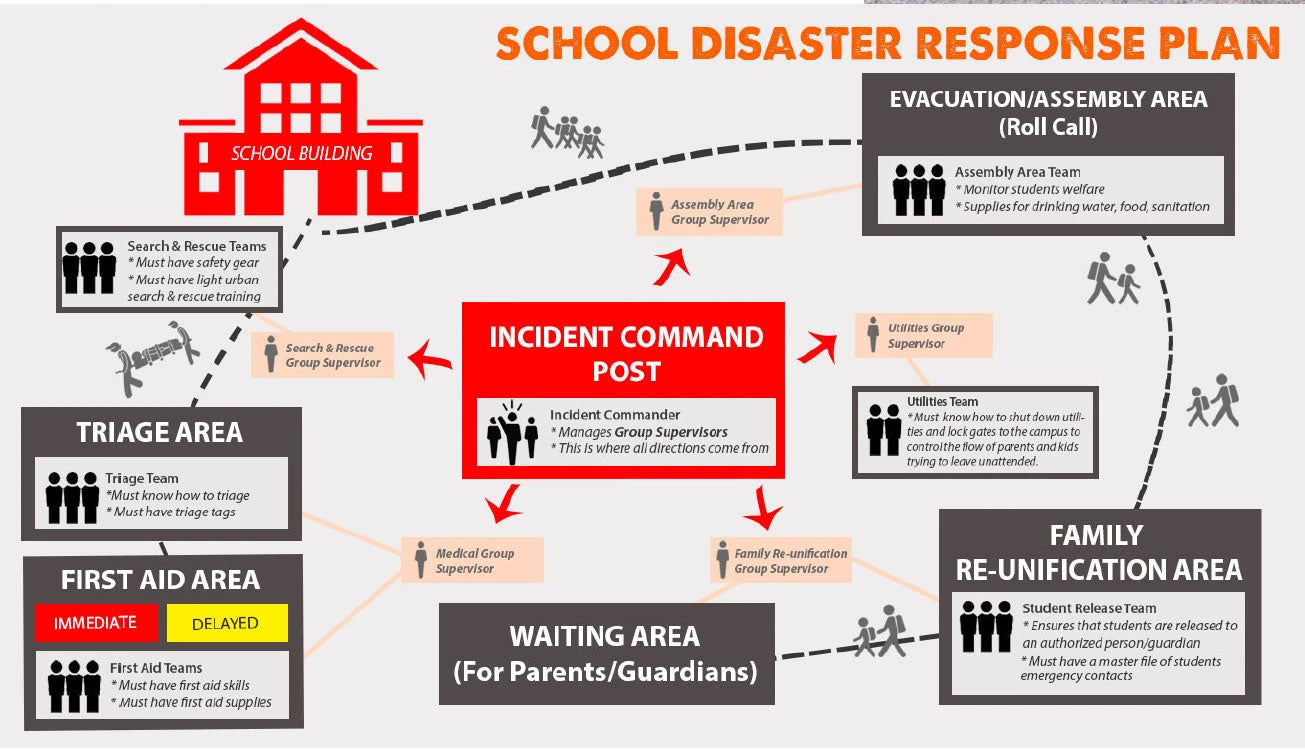
*Image from School Disaster Preparedness Calculator Report
Step 1: Evacuation and Utility Shut Off. Once the shaking stops, students will evacuate the building to the Assembly Area. While they are evacuating, your Utility/Security Team must shut off all utilities to prevent further damage.
What you need to plan for: Prepare an evacuation route and train your staff exactly on how they will evacuate the students. What will the teacher do if there are injuries? Will they mark the doors? What is your buddy system policy? How can they make sure that everyone has evacuated? These little things, if not stated before hand can cause bigger problems. See below on how to choose your layout your evacuation route.
Step 2: Roll Call. Your Assembly team will perform a roll call in the Assembly area. That information will go directly to the Incident Commander (IC).
What you need to plan for: All teachers must give the role call list to the assigned Assembly Teams Group Supervisor who in turn reports to the Principal (IC) if anyone was left in the building. See below on how to build your team. The assembly team is also responsible in looking after the welfare of the students while they are waiting for their parents/guardian to come and pick them up. You also need to consider that there will be delays in transportation due to road blocks - caused by earthquakes. So your school must be able to provide them with basic needs such as water, food and sanitation. See below for the whole school supply list.
Step 3: Team up and Gear up. While the assembly team is doing the roll call, the rest of your emergency teams will be gearing up for their assigned roles and starting their operations.
What you need to plan for: Who will be responsible for what roles and what supplies do they need to perform their duties.
Communication is a crucial part of the operation. Staff must know what their roles are and what exactly what is expected of them in advance of a disaster.
The Incident Commander and Group Supervisors will set up their Incident Command Post. The Search & Rescue Group will be gearing up and getting ready for their rescue operation - how will they know which location to search first (this must be included their training). The Medical Operations Group will be setting up their Triage and First Aid Area, with supplies. The Utility/Security Group must secure the utilities and gates. The Family Reunification will set up at the front of the school and organize for the release of children.
Organizing your Emergency Response Teams is one of the most important parts of your planning. See below on how you should structure your Emergency Response Teams. Work with your logistic team to come up with a realistic list of supplies that your team needs. See below the list of supplies recommended for your school.
Step 4: Operations. The entire staff (regardless of their role) must learn the LifeSavers and the overview of your plan. They need to understand the chain of command and who they report to. Group Supervisors must have training in the group functions they are responsible for. Team members of Search & Rescue must have training in Light Urban Search & Rescue, the Medical Operations Group must have training in Triage and Disaster First Aid and the Utility Group must have training in managing the Utilities and Fire Control.
Evacuation Route and Locations
Here’s an example of a school site map with evacuation route and locations.

- Assembly/Evacuation Area. Consider a location where it’s near to your emergency supplies, so you don’t have to travel too far when distributing food and water.
- Medical Operations Area. Consider a location where it’s near the classrooms, for transport of the injured. But, not too close to the Assembly Area.
- Family Reunification Area. Ideally this is near the school gate location.
- Incident Command Post. Consider a location that is not too close to other areas but is in the middle of all areas. This way, your incident commander can see the overall operation, but is not too close that they would become overwhelmed.
Emergency Response Team Organizational Chart and Responsibilities
Here’s an example of what your Emergency Response Team should look like (download the editable power point version here):

Understanding SEMS/NIMS/ICS for Schools
Emergency Response Teams are only one part of a larger organizational structure called the Standardized Emergency Management System (SEMS) or the National Incident Management System (NIMS) and the Incident Commander (IC) must have a good understanding of these emergency functions. In my post about SEMS/NIMS here, I cover a basic introduction to the Incident Command System.

- The Operations Group are the “doers” of the Incident Command System, they are the hands on group. They carry out the tasks for the plan.
- The Planning Group are the “thinkers”. They create a realistic plan that the operations group can execute. They work with the Logistics group to come up with the list of what the operations group will need to carry out the plan. You can’t create a plan where there are 18 helicopters that will pick up the kids - that’s not realistic.
- The Logistics Group are the “getters”. They will get the supplies that planning group have requested, and they have to work with the Finance group to make sure that the cost is within the budget.
- The Finance Group are the “payers”, they track the money side of everything.
All these groups report to the Incident Commander. Each school site will have its own Incident Commander (site commander), so these IC’s would report to the School District’s IC - Emergency Operations Center (EOC) which would report to the City’s IC who reports to the County’s IC who reports to the State’s IC, and if the incident was massive, the State’s IC will have to report to the Federal/National Level.
How many members do you need for your Emergency Response Team?
This is an example of an emergency team structure for a school with a population of 900 people. Including Search & Rescue, Medical Operations (First aid and Triage), Utility, Assembly and Family Re-unification Team. (See the ideal ER team structure for your school here)

How to build your school emergency response team?
In summary, you need:
- Incident Commander (IC). This person is in charge of providing direction and appoints people to positions. He/she directly manages the Group Supervisors, the key personnel who are assigned to each group function.
- Group Supervisors (GS). There are 5 main group functions for the Emergency Response Teams; (1) Medical Operation Group (2) Search and Rescue Group (3) Utility & Security Group (4) Assembly/Evacuation Group (5) Family Reunification Group. Each group will have its own Supervisor. This person supervises the team leaders responsible for a specific task and runs the overall work group's action plan.
- Team Leaders (TL). Groups can be divided into teams for faster response and easy management. Each team will have 1 Team Leader that acts as the safety officer for its team members and directs the teams activities. This person reports all activities, needs and accomplishments to the Group Supervisor.
- Team Members (TM). Each team must include a minimum of 2 members to maximum of 7 members. These persons follows the direction of the Team Leader.
School Emergency Response Teams: Incident Commander and Group Supervisors

Get your ideal number of supplies using our School Calculator.
School Emergency Response Team: Search & Rescue Teams

All members of your Search & Rescue Team must have training in Light-Urban Search & Rescue. They must be able to perform safe search techniques, forcible entry skills, proper methods of removal of trapped and untrapped victims and using various lifts and carries. When selecting members to your Search & Rescue Team, choose staff who are physically fit and capable of lifting heavy objects/victims.
Required emergency supplies for your S&R Teams: A Team Leader Bag for each S&R Team Leader and Safety Gear for each S&R Team Member. To determine the ideal quantity of supplies use our School Calculator.
School Emergency Response Team: Medical Operations Teams (Triage and First Aid)

All members of your Medical Operations Team must have training in Triage and Disaster First Aid. Unlike the basic first aid skills, Disaster First Aid skills is for a mass casualty disaster set up, your team must prioritize on providing care and resources to those who need it most.
Required emergency supplies for your Medical Operations Teams: Triage Tags, Triage Tarps and Disaster First Aid Kits. Get the ideal quantity of supplies using our School Calculator.
School Emergency Response Team: Utility & Security Team

Your Utility Team must know in advance where the gas, electric and water meters are and how to shut them off. Immediately following an earthquake, the team must turn off all the utilities. This is extremely important, this can prevent further property damage and life safety hazards.
Required emergency supplies for your Utility Teams: Utility Shut Off tool, Flash lights/Light sticks.
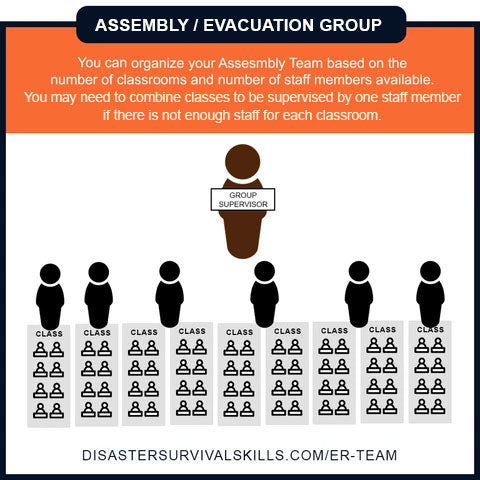
Assembly/Evacuation Area Team
Your Assembly Team will consist of the most members in your Emergency Response Team. You can organize your Assembly Team based on the number of classrooms and number of staff members remaining (who are not part of other groups yet). If there is not enough staff to (1 Staff: 1 Classroom), you may combine classes to be watched by one staff member. They will be responsible for the welfare of all the students while waiting for their parents/guardian to pick them up.
Required emergency supplies for your Assembly Teams: Water, Food and Sanitation (Toilet).
Get the ideal quantity of supplies using our School Calculator.

Family Reunification Team
This team must have access to the records of all the students and guardians emergency contact details.
You may assign 1-2 staff per year level. Consider having a printed list ready in case of power loss and no internet.
Training & Practice Drills
How to perform the Drop, Cover, and Hold on Position
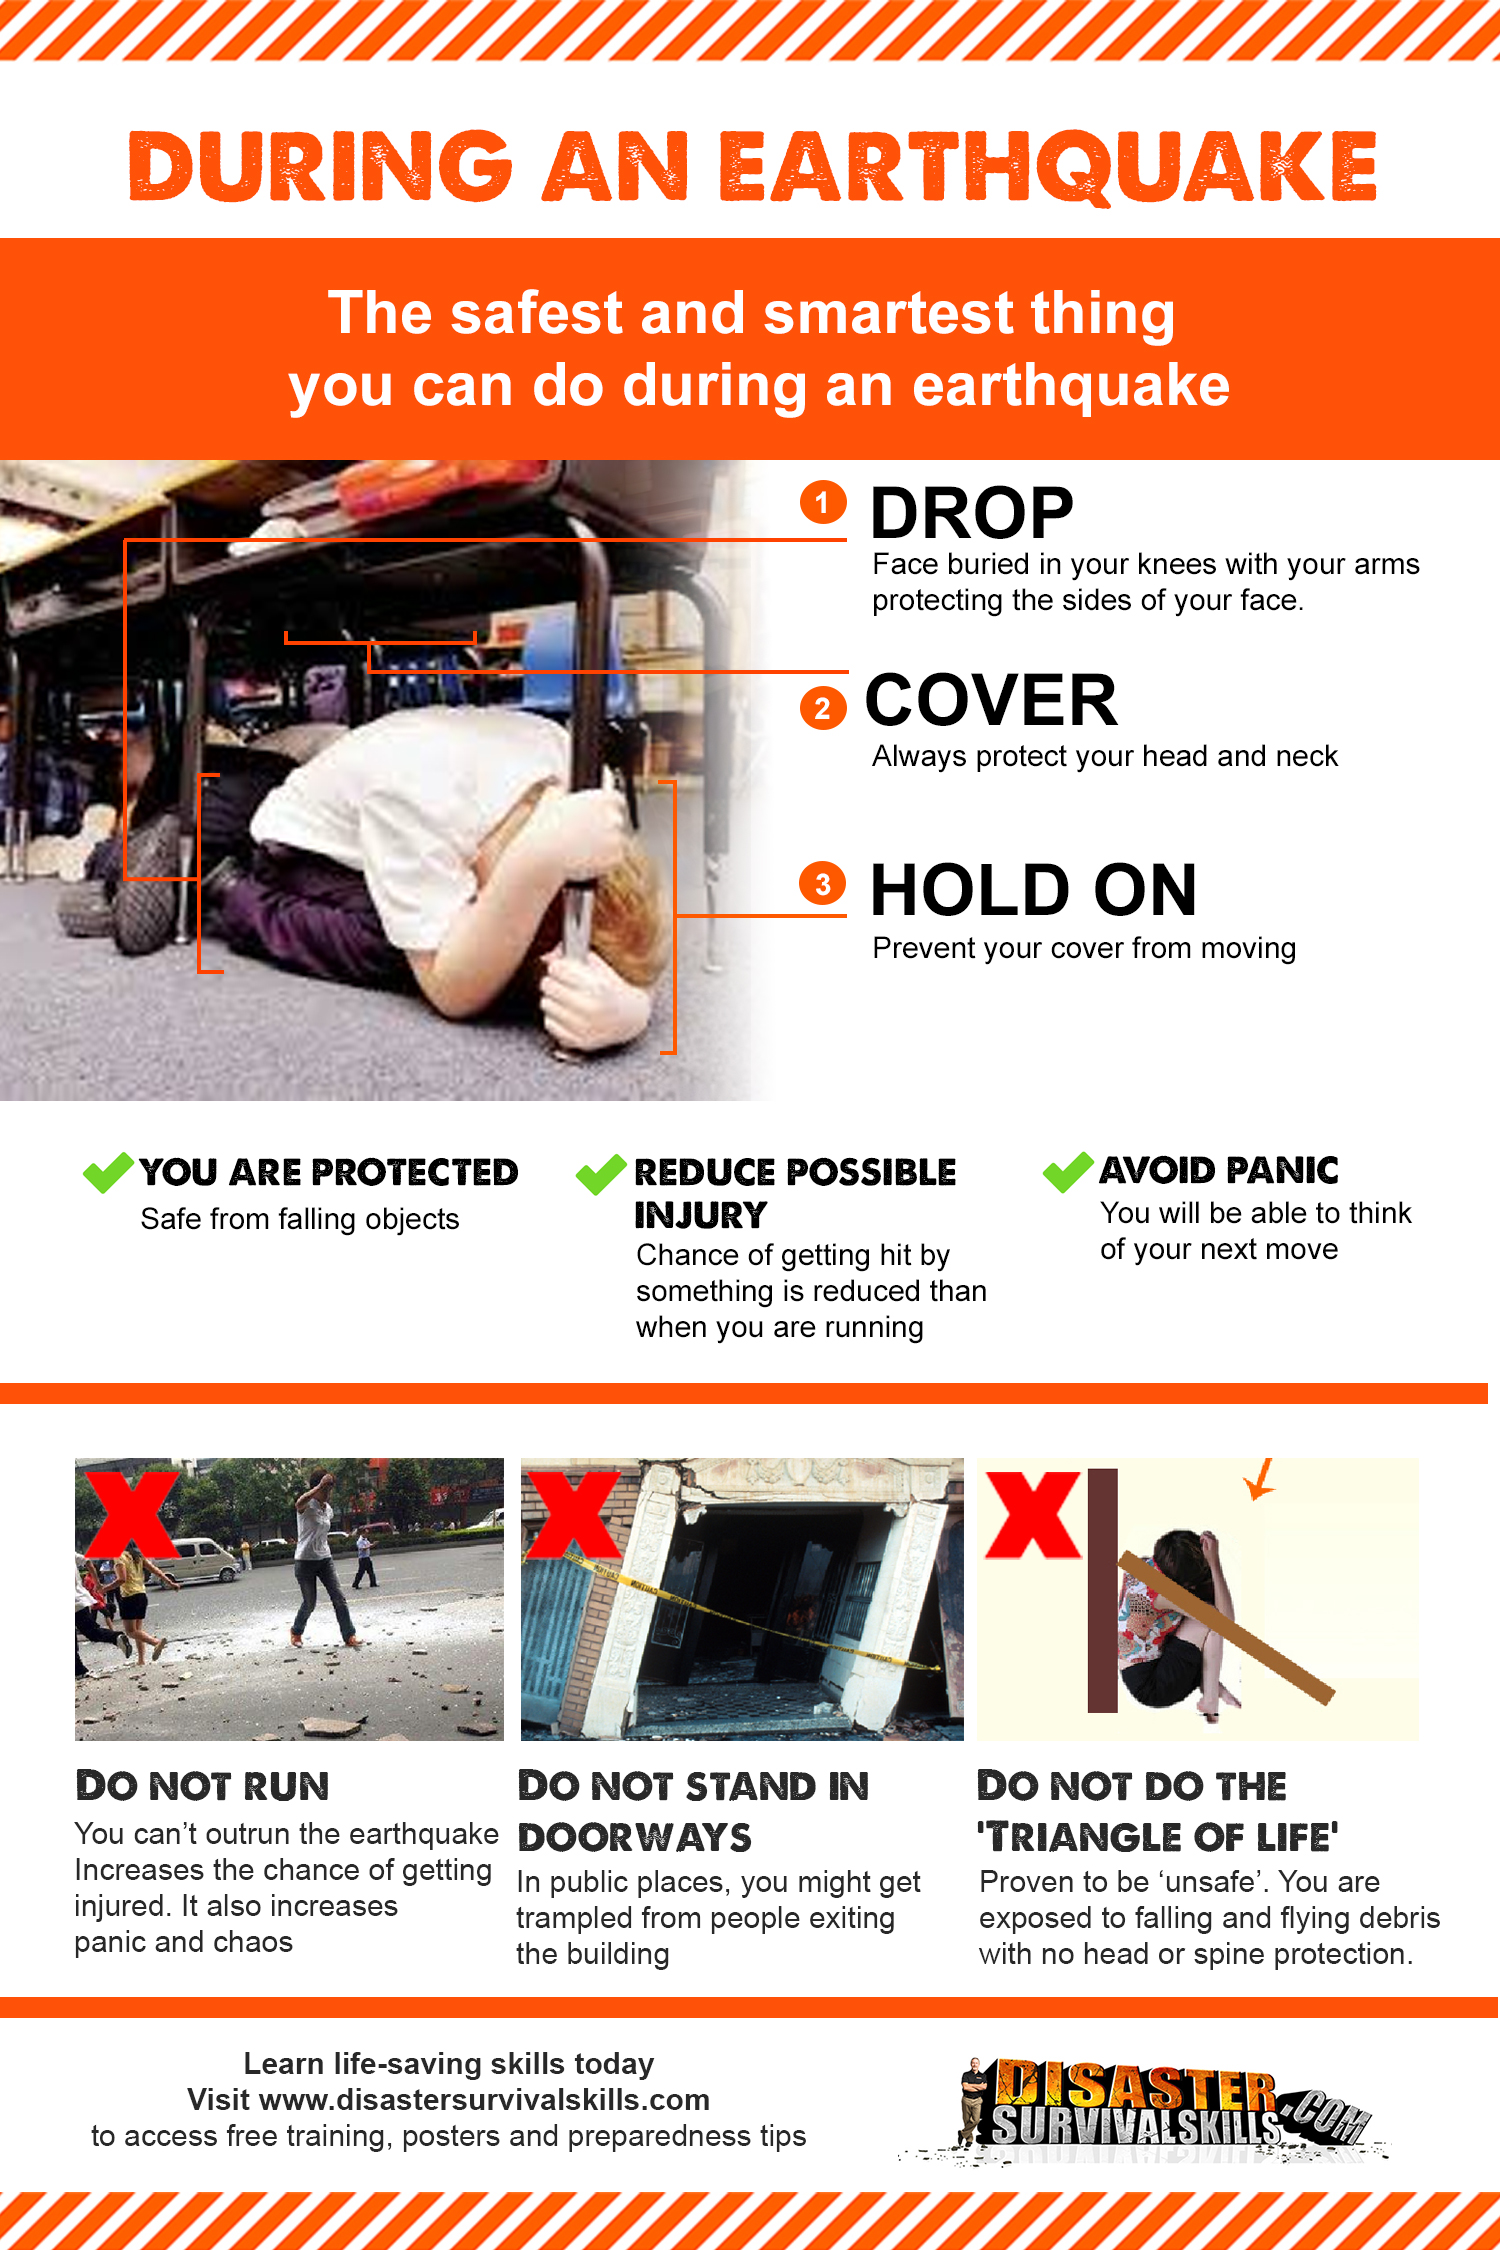
During earthquake, people will panic. They will RUN! Running causes chaos and more injuries. Injuries caused getting by flying and falling debris and the human stampede. If the staff panics and becomes injured your disaster just became worse. No one to care for and guide the students creating even more problems.
Solution: Train your staff to DROP, COVER, and HOLD ON. That simple.
The good news is that people panic because they don't know what to do. If you have trained them in exactly what they need to do during an earthquake, you have already made your job easier and your response operation will got a lot more smoother.
Drop, Cover, and Hold on position will keep you calm and safe. This position will help you think and plan of what to do next. This also decreases the chance of getting hit from falling debris. You can download this poster here.
What are the LifeSavers? The 3 Important Skills for ALL your Emergency Response Team Members and Staff
While there are specific skills for each task group, there are 3 important skills that everyone at your site must know, these are the LifeSavers.
These LifeSavers manage 3 life-threatening conditions;
1) Problems Breathing
2) Severe Bleeding
3) and Shock
The LifeSavers controls these conditions and delays shock. Your job (whatever your role) is to make sure that you perform the LifeSavers prior to leaving anyone behind or transferring them to the first aid area.
Here's a infographic how to perform the LifeSavers. You can also access my free video training here to learn the LifeSavers.

Let’s have some examples on how you can apply LifeSavers in real world emergency:
Scenario #1: You are a teacher with a class of 30 students. There are 3 students who are injured. You don't want to leave them behind but you can't stay, you need to make a decision. You need to be quick because you need to evacuate the rest of the class. So the best thing that you can do for the victims is stabilize them using the lifesavers. Before you leave them, perform the lifesavers. This way, you have greatly improved their chances of survival.
Scenario #2: You are a search & rescue member and during your operation, you find a victim who is severely bleeding. DO NOT transport the victim while they are bleeding. Control the bleeding first, it will only take seconds to apply a pressure dressing for the victim’s survival.
What are the supplies you need to perform LifeSavers?
- To control breathing, you don’t need any supplies since you just need to place the victim in the recovery position.
- To control bleeding, you will need trauma dressings to cover the wound and triangular bandages to secure the dressing for hands-free bleeding control. For the rescuer’s protection, it’s advisable that you wear protective gloves from exposure to bodily fluids. See the LifeSaver Pack.
- To control shock, you need to place the victim in the shock position and keep them warm by using a thermal blanket.
Once you have your emergency response team set, it’s time to provide them the skills and the confidence to carry out the plan and their function.
Light Urban Search & Rescue Training For School
Your on-site Search & Rescue team members need to be trained in:
- Search techniques
- Forcible entry skills
- Proper methods of removal of trapped and non-trapped victims
- Using various lifts and carries
 Get a copy of the book:
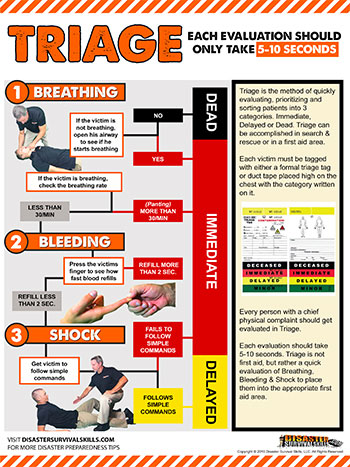
Fire/Utility Control
Your utility team has a very important task, they need to know where the utility meters are located and how to shut them off. By shutting all utilities, you are preventing further damage to your site. 
Earthquake Kits For Schools and Emergency Supplies (Content List)
To maximize your school budget, you should purchase supplies in the order of priority. I highly recommend that you use our Disaster Preparedness Calculator for Schools to get the right number of items for your school and emergency response teams.
If you want to gather supplies yourself, here is our minimum recommendations:

Command Post Barricade Tape, Public Information Barricade Tape, Staging Area Barricade Tape, 2-Commander Walkie-Talkies, Bull Horn, FM-Weather-Shortwave Radio with Light, National Incident Management System (NIMS) Guide, Incident Command and Triage Book. Product: Incident Command Post and Triage Package.

(Medical, Search & Rescue, Assembly: Vests, Ponchos, Clipboards, Golf Pencils, Light Sticks 12 hr. Product: Incident Command Post and Triage Package. *This package also include Triage kit for your Triage team (see Medical Operation Group below)

Triage Tarps and Triage Forms for patient evaluation, body identification, injury assessment with triage instructions. This is included in our Incident Command Post and Triage Package. They should also wear vinyl gloves for their protection but this can come from your First Aid Supplies.
FOR THE FIRST AID TEAM

Stretchers, trauma dressings, 4×4 gauze pads, triangular dressings, rolls of gauze, leg splints, arm splints, burn gel, cold packs, sterile water packs, first aid tape, duct tape, emergency thermal blankets, paramedic scissors, tweezers, vinyl gloves, antiseptic wipes, antimicrobial wipes, band-aids. Product: Disaster First Aid Kit and Stretchers
FOR EACH SEARCH & RESCUE TEAM LEADER

Hard hat, goggles, vest, dust masks, leather gloves, knee pads, marker, pry bar, door wedges, 4 in 1 utility shutoff, window hammer, duct tape, search rope, flashlight, light sticks, hazard tape, drinking water. Product: Search & Rescue Team Leader Bag, Rescue Cribbing and LifeSaver Pack
FOR THE SEARCH & RESCUE TEAM MEMBER
Hard hat, Goggles, Dust Masks, Vest, Gloves and Knee Pads. Product: Individual Safety Gear

Fire Extinguishers and 4-in-1 Utility Gas Shutoff Tool
Drinking water, emergency food pack, and sanitation kit (privacy shelter and porta-potty)

Have 1 Classroom Evacuation Back Pack. Contents: Door wedge/stop, safety vest, light stick, water, thermal blankets, trauma dressings, triangular bandages, antiseptic wipes, vinyl gloves, band-aids, antimicrobial wipes and CPR shield.
Earthquake Hazard Mitigation For Schools
There are 2 types of earthquake hazards, structural and non-structural.
Structural hazards are the building structure itself. So structural mitigation would need a large budget, but the good news is if your building (in US) was built after 1994, there's a good chance that you don't need to worry too much about the structural side of your building. Otherwise, you would need to talk to an engineer to help you assess your school. You can also download this PDF from FEMA about Earthquake Safety For Schools.
In this post, we'll only cover the nonstructural hazards, such as furniture, lights, appliances, mechanical equipment, things that are not part of your building structure. Did you know? That 55% of the injuries during the 1994 Northridge earthquake were caused by falling furniture or objects? Only 1% of injuries were caused by building damage. This study was made by the University of California in Los Angeles (UCLA). This is why mitigation is so important to address before the earthquake.This alone could save children from potential injuries.
What is earthquake hazard mitigation?

The idea of earthquake hazard mitigation is to identify the hazards in your school and try to reduce them. Here are the steps to mitigate your school hazards.
1. Move or anchor furniture that is taller than it is wide. Start by moving furniture such as bookcases and shelves away from chairs where people sit or spend a lot of time. If this is not possible, like in classroom or libraries, then you would want to anchor them to the wall. Most local home improvement stores have straps and anchors for most applications (for chimney, water heater, furniture, TVs, computers etc.) Just ask them about earthquake strapping for furniture. Checkout my post on the steps on how to anchor furniture.
2. Secure and rearrange objects inside your shelves. Move heavy or breakable objects to lower shelves. Use earthquake straps for bookcase and covers to prevent objects from falling.
3. Use Quake Hold or Museum Wax. Trophies, pottery objects, and lamps are deadly if they fall, so use quake hold or museum wax to seal them to their place, don't worry these won't damage your objects.
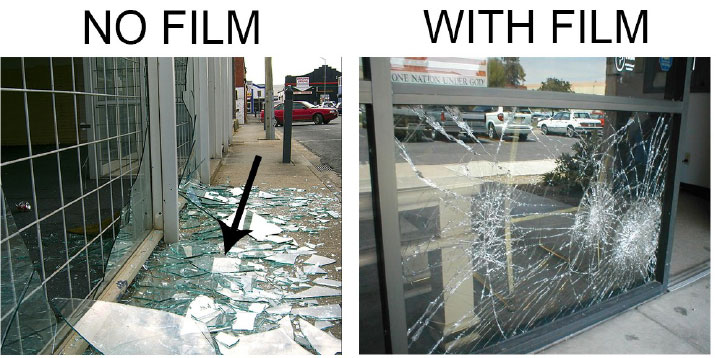
4. Cover your windows with a safety film. Next, consider covering your windows with safety film, especially any glass that is over 4’x6′ in size. These size windows can shatter and implode into your room causing life-threatening injuries. I would recommend at least a 4 mil thick version of the film. This provides excellent strength, increases and provides a strong barrier between you and the glass to help protect you from flying shards of glass.
Question: Some folks asks if they have to film wall mirrors, no need. They won't implode as they are already sealed to the wall, unless they are hanging mirrors which will fall into the next step.

5. Use closed hooks when hanging mirrors and pictures. If you’ve watched earthquake movies, you’ve probably have seen those falling mirrors and pictures. Though they might not very dangerous, you still wouldn’t want to damage those works of art.
Use closed hooks to hang frames and mirrors, this will prevent the frame falling down even when it’s shaking.
By this time, if you’ve started to do these steps, you’ll feel more confident.
There are more ways to mitigate your school from earthquake hazards, download this checklist that includes a long list of items that you can do to get your school earthquake resilient.
In summary
Earthquake preparation can be a daunting task, but it's actually very simple. You just need to know what the risks are to your school and try to reduce those hazards.
Organize your teams, create a planning group to help you create your Emergency Response Teams. Get to know your staffs existing skills.
Train them for their roles. Check with your local fire department to see if they have programs where they could train your staff on incident command system, search and rescue, triage, first aid and fire control. I am currently creating an online version of our Disaster Survival Skills Workshop. Email us if your school is interested to register.
Gather supplies. Use our free disaster preparedness calculator to save you time in creating a list of all the supplies that you need. Budget maybe the biggest concern here, but I recommend getting supplies based on priorities, the calculator generates a report and gives you a list based on what's most important.
Mitigate hazards. Go in each room and identify the hazards, what could fall, can you remove them or how can you prevent them from falling.
Practice Drills. Your school might already be doing earthquake drills. Test your skills, how long will it take for teachers to evacuate all the children. Try to do it with some scenarios, if someone was trapped, how long will it take for your team to rescue them.
I hope this helps.